
You can set up magnetic track lighting, even if you are new to DIY. If you follow a step-by-step guide, you will not make common mistakes. You will also make a nice lighting setup. Safety is very important, so always plan well before you begin. Look at this quick table to help you avoid beginner mistakes:
|
Common Mistakes |
Why to Avoid Them |
|---|---|
|
Ignoring main light design |
Leads to poor lighting layout |
|
Incorrect distance from wall |
Blocks light and hurts the look |
|
Overcrowding track lights |
Makes the track look messy |
|
Not hiring experienced help |
Can cause costly installation errors |
This guide gives you easy tips to help you do well, so let’s begin!
Getting ready is the most important part of any project. If you want your magnetic track lights to look great and work well, you need to focus on preparation for installation. Let’s break down the required tools and materials you’ll need, plus some tips to keep you safe.
You should use the right tools for this job. Here’s a list to help you get started:
Drill and drill bits
Measuring tape
Level
Screwdriver
Wire stripper
Screws and anchors
Electrical tester
Wire nuts
Magnetic track light kit (tracks, connectors, light fixtures)
Protective gear (gloves and safety glasses)
If you gather these required tools before you begin, you’ll save time and avoid mistakes.
You need to pick the best materials for your setup. Magnetic track lighting systems are flexible and modern, so they fit well in most homes. Many people choose LED track lights because they last a long time and use less energy. Designers like minimalist styles, and magnetic track lights blend in with home decor. Here’s a quick checklist:
Magnetic track rail
Magnetic track lights
LED track lights
Anchors
Screws
Check that you have all the tools and materials before you start. This step makes preparation for installation much easier.
Safety comes first. You should always check the area for hazards before you begin. Make sure the electrical system can handle your new lights. Test the power with an electrical tester and turn off the breaker before you touch any wires. Use protective gear like gloves and safety glasses. Mount the track on a strong surface so it stays secure. Follow the manufacturer’s instructions for every step. After you finish, inspect the connections and fixtures. Set up a routine to check for wear and tear.
Tip: If you feel unsure about wiring, ask a professional for help. It’s better to be safe than sorry!

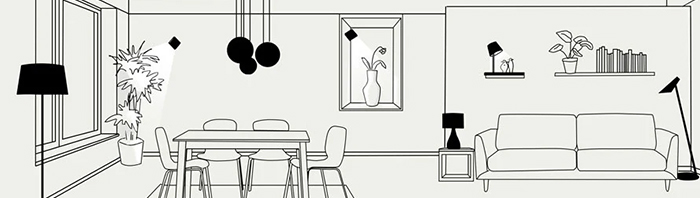
Before you start, take a moment to picture how you want your room to look. Magnetic LED track light gives you a lot of freedom, so you can get creative. Many people love this style because it looks clean and modern. You can use it to highlight cool features in your home or just to make the space feel brighter.
When you plan your layout, think about these points:
Layered lighting: Mix general, task, and accent lights for a balanced feel.
Flexible zoning: Set up different areas for reading, relaxing, or working.
Highlighting features: Use lights to draw attention to art, shelves, or unique walls.
Minimalist look: Keep things simple for a tidy, modern vibe.
Magnetic track lighting is popular because it blends form and function. It helps you avoid the clutter of old-fashioned lights and gives your home a fresh, stylish look.
Picking the right track rail is a big step in this guide. You want something that fits your space and matches your needs. Here’s a quick table to help you decide:
|
Criteria |
Description |
|---|---|
|
Height of the Space |
Check your ceiling height to pick the right size and type of light. |
|
Lighting Needs and Goals |
Decide if you want general, task, or accent lighting for each area. |
|
Style and Design |
Choose a rail that matches your home’s style and makes the room look better. |
|
Energy Efficiency |
Go for LED options to save on energy bills and help the planet. |
|
Compatibility with Electrical |
Make sure the system works with your current wiring for easy setup. |
|
Track Types |
Pick the right track type for the best performance and power. |
You can find small, medium, or large LED magnetic lights. Small ones work well for desks or reading nooks. Medium lights fit most rooms. Large lights are best for big, open spaces.
Now, think about where you want to put your track lighting for home. You can mount it on the ceiling or the wall. Ceiling mounting works well for most rooms and gives you even light. Wall mounting can help you highlight art or special features.
Ask yourself these questions:
Do you want to light up the whole room or just certain spots?
Is your ceiling high or low?
Do you want the lights to stand out or blend in?
This guide helps you make smart choices so your track lighting for home looks great and works well. Take your time with this step. Good planning makes the rest of the project much easier.
Setting up magnetic track lighting can feel like a big job, but you can do it if you break it down into simple steps. Let’s walk through each part of the installation together.
Before you start, you need to get your installation area ready. A clean and safe space makes everything easier. Here’s what you should do:
Decide where you want to put the magnetic track lights. Measure the length of the rail you need.
Check that the ceiling or wall is flat and strong enough to hold the track.
Turn off the power at the breaker. This step keeps you safe while you work.
Tip: Always double-check that the power is off before you touch any wires.
Now, you need to mark where the track will go. Grab your measuring tape and level. Use a pencil to draw a straight line where you want to mount the track. Make sure the line is even. If you want your super slim profile magnetic track lightings to look professional, take your time with this step.
Use the level to keep the track straight.
Mark the spots for the screws or anchors along the line.
Double-check your measurements before you drill.
You have a few ways to mount the track, depending on your ceiling or wall. Here’s a quick table to help you pick the best method:
|
Method |
Pros |
Cons |
|---|---|---|
|
Surface-Mounted |
Simple and quick to install |
Track is visible |
|
|
No ceiling cutting needed |
May not blend in with all ceiling styles |
|
|
Good for retrofits and solid ceilings |
|
|
Trimless Recessed |
Seamless, invisible finish |
Most complex and expensive to install |
|
|
Great for new builds or major renovations |
Needs ceiling modification and skilled workers |
|
|
Modern and minimalist look |
Not easy to add later |
|
Pendant |
Adjustable height for different needs |
Needs strong ceiling anchors |
|
|
Adds a dramatic look to large spaces |
Track and wires are visible |
|
|
No need for ceiling grooves |
Not ideal for low ceilings |
For most homes, surface-mounted tracks work best. Use screws or anchors to secure the track. If you want extra strength, attach the track to ceiling joists or use wood blocking. Drill pilot holes first, then fasten the track tightly. This step is key for a safe installation.
You need to connect the electrical wires before you can use your magnetic track lights. Safety comes first, so follow these steps:
Turn off the power at the breaker.
Use a voltage tester to make sure the wires are not live.
Use insulated tools and wear gloves and safety glasses.
When you connect the electrical wires, watch out for these common problems:
Sometimes, the copper rails inside the track can slip and not touch the adapter. Make sure they line up.
If every other light does not turn on, you might have a load management or switch issue.
Some dimmers do not work well with low voltage lighting. Check your dimmer’s compatibility.
Take your time when connecting to the power supply. If you feel unsure, ask an electrician for help.
Now you get to the fun part—installing the magnetic lighting! You can attach the magnetic light fixtures to the rail in just a few steps:
Find the joists or blocking above your ceiling for the strongest support.
Use toggle bolts, molly bolts, or long screws to anchor the track to the structure.
If you use a hanger system, follow the kit instructions for a secure fit.
Snap the magnetic track lights onto the rail. You should hear a click when they lock in place.
Adjust the position of each fixture to aim the light where you want it.
Note: Always check that each magnetic light fixture is firmly attached before you finish.
You have now completed the main installation steps. Your magnetic track lighting is almost ready to shine!
You’ve installed your magnetic track lights, so now it’s time to see them in action. Flip the breaker back on and use the wall switch to power up the lights. Watch each fixture as it turns on. If every light works, you’ve done a great job! If some lights stay off or flicker, don’t worry. You can fix most problems with a few quick checks.
Tip: Always test your system after installation. This step helps you catch issues before they become bigger problems.
Sometimes, new lighting systems run into trouble. Here are the most common problems people report:
|
Issue Type |
Description |
|---|---|
|
Power Supply Failures |
Damage from electric shock or circuit failures can stop your lights from working. |
|
Installation Errors |
Mistakes during setup can cause lights to malfunction. |
|
Thermal Management Issues |
Poor heat dissipation can make the system overheat and fail. |
You might also notice these issues:
Mismatch between LED light board and driver
Damaged drive power supply
Inadequate heat dissipation from the lamp shell
If you run into trouble, try these steps:
Check the power supply. Make sure the breaker is on and the outlet works.
Examine the track. Look for loose connections or damage.
Inspect the lights. Slide each fixture along the track to see if one is faulty.
Check the transformer. Listen for odd sounds or feel for overheating.
If problems continue, call a licensed electrician.
Keeping your lighting system in good shape is easy. Regular care helps your lights last longer—some LED systems can shine for 50,000 to 70,000 hours, and some even reach 80,000 hours!
Here’s how you can maintain your setup:
Schedule regular inspections to check light output and look for damage.
Clean the fixtures with a microfiber towel. Always turn off the power first.
Replace defective bulbs right away.
Make sure heat sinks and vents stay clear for better cooling.
Protect your lights from dust, moisture, and extreme temperatures.
Follow the manufacturer’s instructions during installation and cleaning.
Note: Use a soft-bristled brush or microfiber cloth to clean the track and bulbs. Avoid liquids to keep everything safe.
With these tips, your magnetic track lights will stay bright and reliable for years.
You just learned how to plan, install, and test magnetic track lighting. If you follow each step, you can set up your own system—even as a beginner. Always double-check your work and put safety first. Once you feel confident, try smart features like voice control or app-based dimming.
|
Why You’ll Succeed |
How It Helps You |
|---|---|
|
Easy to install |
Snap lights on and off |
|
Flexible design |
Move lights where you want |
|
Safer low voltage |
Worry less about shocks |
You’ve got this! Your next DIY project will feel even easier.

 IPv6 network supported